
Hey everyone, welcome to a new post! Today, I’m going to make Retrofit in Android easier and faster to use. If you’ve worked with Android development before, you’re probably familiar with Retrofit—it’s a popular library for making API calls in Android apps. In fact, if you have even a little experience in Android development, chances are you’ve already used it. But what makes this post special? Stick around to find out!
Even if you’re already familiar with using Retrofit in Android, this post might offer you some fresh insights. Here, I’ll show you how to automate Retrofit in Android, meaning all the necessary Retrofit code will be generated instantly with just a simple Gradle command. Sounds exciting? Let’s dive right in without any further delay!
Table of Contents
Retrofit in Android Made Easy
To make Retrofit in Android simpler and faster, I’ve created a custom Gradle plugin called “Netro”. You can check it out here. Instead of following the traditional, documented approach to setting up Retrofit, this post will show you how to leverage Netro to streamline networking in your Android project. For demonstration, I’ll be using DummyJSON as the RESTful API, but you can easily adapt it to work with your own APIs with minimal adjustments.
Getting the Starter Project
Before you begin, you’ll need to set up the starter project. It comes with everything you need to get started, including:
- Preconfigured dependencies
- A fully set up Dependency Injection framework
- Ready-to-use Jetpack Compose UI components
This ensures we can focus on our topic rather than setting up the basics!
To get the starter project go to the following link.
The link above will take you to a GitHub repository where you’ll find two ZIP files:
- starter-project.zip – This is the file you need to download. It contains the starter project with all the necessary setup.
- final-project.zip – This is provided as a reference in case you run into any issues while following this tutorial.
However, the goal is for you to build the final project yourself—so hopefully, you won’t need to rely on it!
After downloading starter-project.zip, unzip it and open it in Android Studio. Since the dependencies and setup are already in place, you can explore the project on your own. I won’t be covering basic details like adding dependencies or creating UIs. Instead, let’s get straight to the important part—making an API call.
The APIs
In this post, I’ll walk you through two APIs, and by the end, I’m confident you’ll be able to handle any other API on your own. The first one is the login (auth) API. Below, you’ll find the request body, response, and endpoint URL.
Auth
Endpoint
|
1 2 3 |
'https://dummyjson.com/auth/login' |
Request Body
|
1 2 3 4 5 6 |
{ username: 'emilys', password: 'emilyspass' } |
Response
|
1 2 3 4 5 6 7 8 9 10 11 12 13 |
{ "id": 1, "username": "emilys", "email": "emily.johnson@x.dummyjson.com", "firstName": "Emily", "lastName": "Johnson", "gender": "female", "image": "https://dummyjson.com/icon/emilys/128", "accessToken": "eyJhbGciOiJIUzI1NiIsInR5cCI6IkpXVCJ9...", // JWT accessToken (for backward compatibility) in response and cookies "refreshToken": "eyJhbGciOiJIUzI1NiIsInR5cCI6IkpXVCJ9..." // refreshToken in response and cookies } |
Users
Endpoint
|
1 2 3 |
'https://dummyjson.com/users' |
Response
|
1 2 3 4 5 6 7 8 9 10 11 12 13 14 15 16 17 18 19 20 21 |
{ "users": [ { "id": 1, "firstName": "Emily", "lastName": "Johnson", "maidenName": "Smith", "age": 28, "gender": "female", "email": "emily.johnson@x.dummyjson.com" }, {...}, {...} // 30 items ], "total": 208, "skip": 0, "limit": 30 } |
I’ve trimmed down the response as the actual one is quite large. However, you can visit DummyJSON to view the full response if needed.
Automate Retrofit in Android: Generate API Interfaces & Models with Netro Plugin
With everything set up—the starter project in place and the API details at hand—it’s time to dive in and integrate the API seamlessly!
The Netro plugin is already integrated into the project. You can verify this by checking your app-level build.gradle file.
|
1 2 3 |
alias(libs.plugins.netro) |
For Netro, we need to create a configuration directory to store API details. I’ll define a directory named “netro_configs” inside the project root, but you can name it whatever you like. However, you must inform the Netro plugin where these config files are located. To do this, add the following block to your app-level build.gradle file.
|
1 2 3 4 5 6 |
netroConfig { path = project.rootProject.layout.projectDirectory.dir("netro-configs").asFile.absolutePath packageAlias = android.namespace!! } |
Here, we specify the path where the config files are stored and set the packageAlias, which determines the package name for the generated files. In the code above, the packageAlias matches your current namespace.
You also need to add the following line inside the android block to ensure your project recognizes the generated code.
|
1 2 3 |
sourceSets["main"].java.srcDirs("build/generated/netro") |
Creating YAML Config Files
Once your Gradle setup is complete (which is already done in the starter project), you’ll need to follow the same setup whenever using the Netro plugin. After that, simply define your API configuration manually using YAML inside the directory specified in the netroConfig block of your app-level build.gradle file.
Your config files must follow the naming convention: package_name_config.yaml, which consists of two parts:
- package_name – Netro uses this to create a package and organize the generated code inside it. Think of it as the service name. For example, if you’re creating an API for users, you should name the file user_config.yaml.
- _config.yaml – This suffix is mandatory. If you omit it, your file will not be processed.
Following this structure ensures proper organization and seamless integration with Netro.
Now, let’s create a config file for the Auth Service. I’ve named it auth_config.yaml following the required naming convention.
|
1 2 3 4 5 6 7 8 9 10 11 12 13 14 15 16 17 18 19 20 |
baseUrl: https://dummyjson.com/ endpoints: - name: loginUser path: /user/login method: POST requestModel: LoginRequest responseModel: LoginResponse models: LoginRequest: username: String password: String LoginResponse: id: Int username: String email: String accessToken: String? |
YAML Structure Explanation
The config file consists of the following key elements:
- baseUrl – Defines the base URL of the API.
- endpoints – An array containing API endpoint details. Currently, we have one, but multiple endpoints can be added. Each endpoint includes:
- name – The generated function will use this name, so choose it carefully.
- path – The specific endpoint appended to the base URL.
- method – The HTTP method (e.g., GET, POST, etc.).
- requestModel (optional) – Defines the request payload. Some APIs, like fetching users, may not require it.
- responseModel – Specifies the expected response structure.
All requestModel and responseModel definitions must be placed inside the models section. If your config file contains multiple endpoints, ensure all request and response models are defined within this section for proper organization.
Similarly, I’ll create another config file named users_config.yaml to define the user-related API.
|
1 2 3 4 5 6 7 8 9 10 11 12 13 14 15 16 17 18 19 20 21 22 23 24 25 26 27 28 29 |
baseUrl: https://dummyjson.com/ endpoints: - name: getUsers path: /users method: GET responseModel: UserListResponse - name: getUserById path: /users/{id} method: GET responseModel: User models: User: id: Int firstName: String lastName: String age: Int gender: String email: String UserListResponse: users: List<User> total: Int skip: Int limit: Int |
Once all your config files are ready, you can generate all the Retrofit interfaces and model classes at once with a single command! 🚀
Generating Retrofit Interfaces and Model Classes with Netro
Auto-Generate Retrofit APIs & Models with Netro
Open terminal and run the following command
|
1 2 3 |
./gradlew netroSync |
After running the command, you should see a “Build Success” message, just like in the screenshot below! 🚀
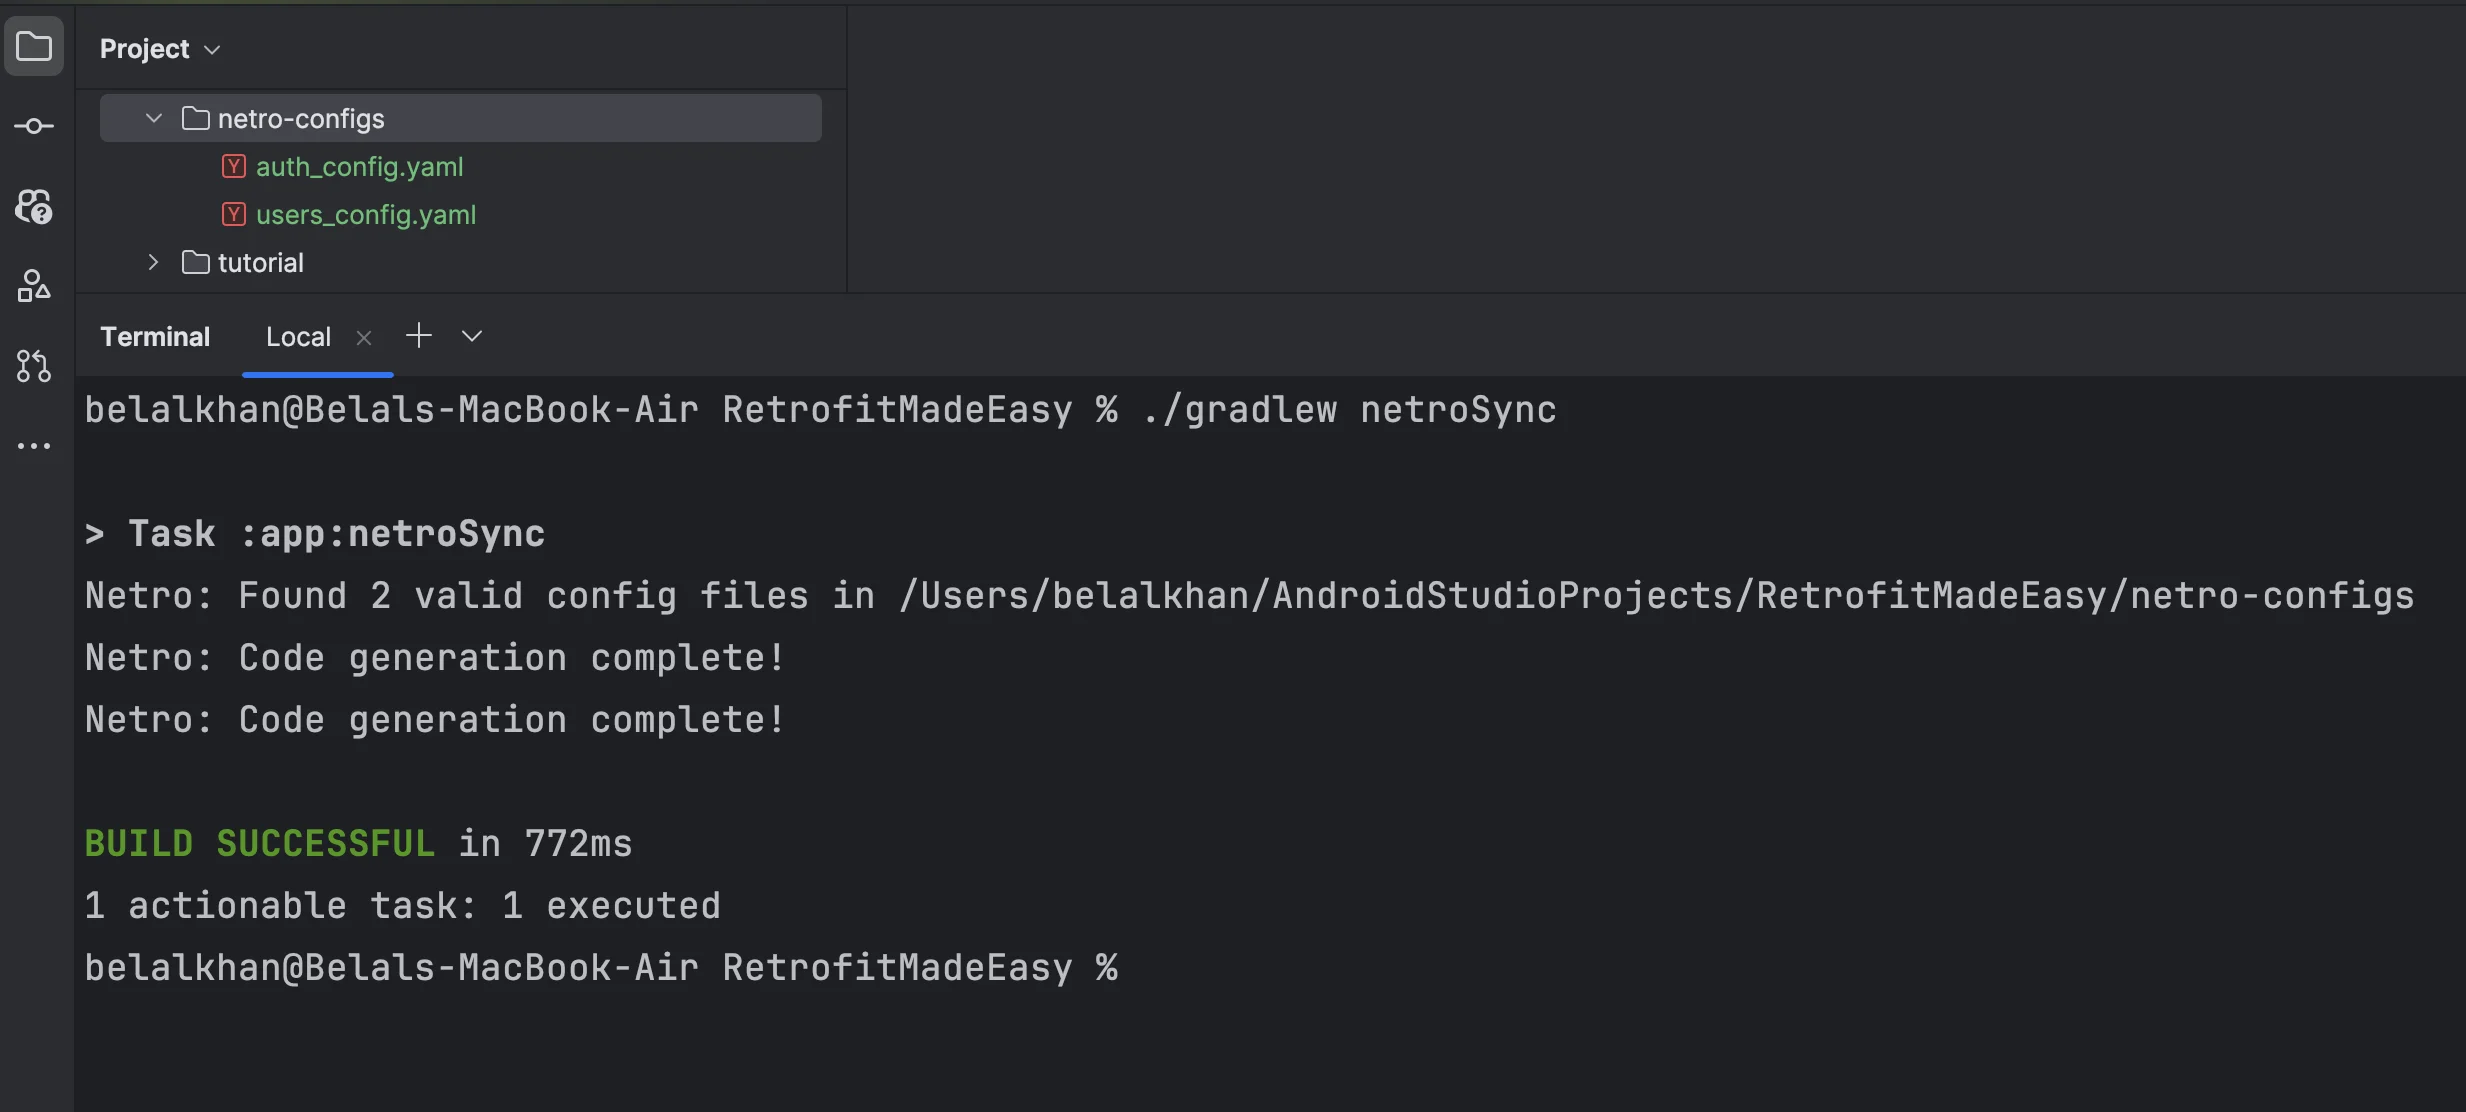
Once you see “Code generation complete!” in the terminal, it means your code has been successfully generated! 🎉 You can find it in the app/build/generated/netro directory.
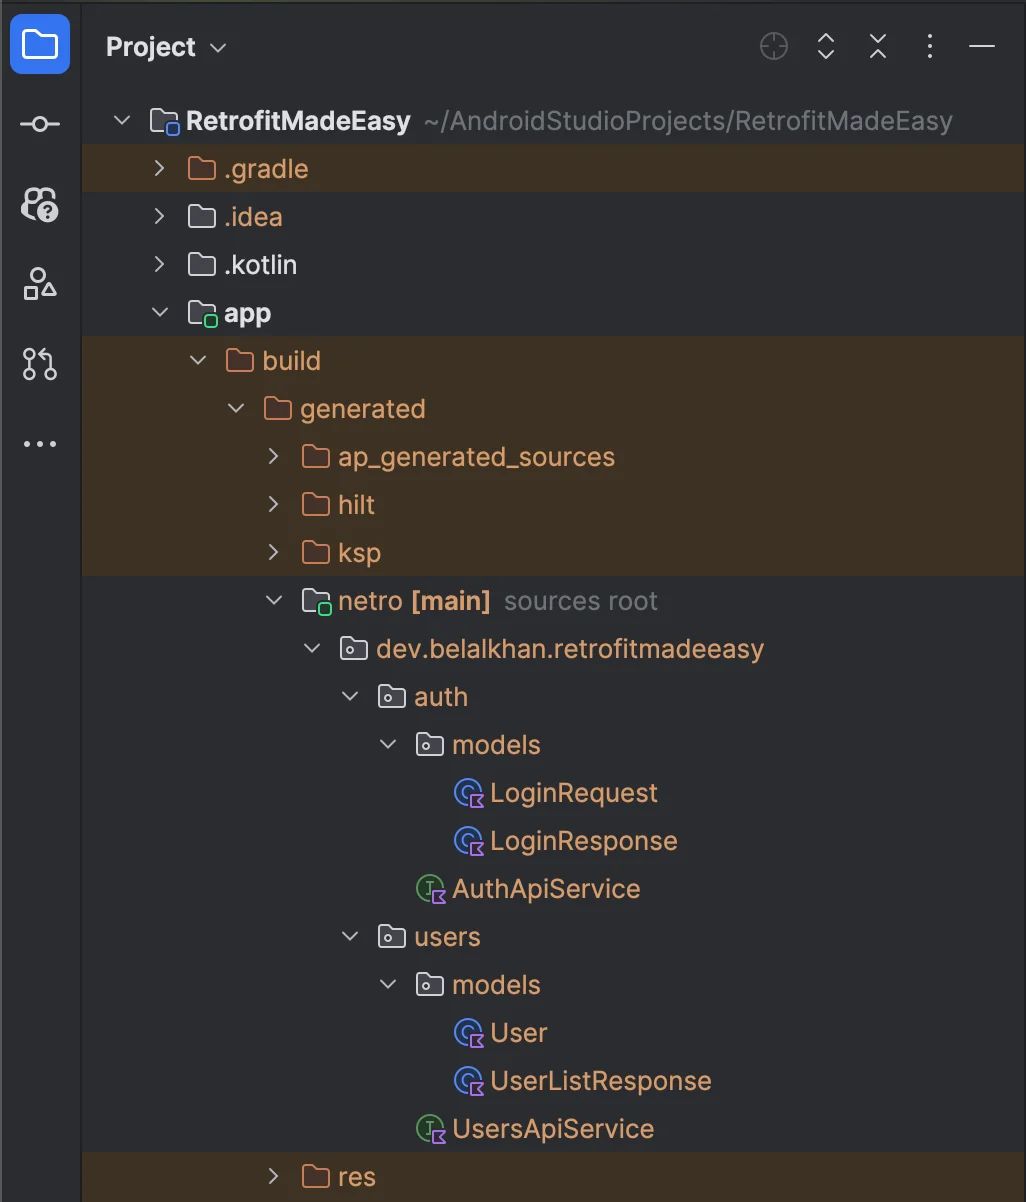
Awesome, right? 🚀 Now, you can effortlessly use these generated services and models in your project! 🎉
Using Auto-Generated Services & Models with Retrofit in Android
The setup is now complete, and the necessary Retrofit interfaces and models have been generated automatically using the Netro plugin. Now, we just need to consume these generated services in our project. To do this, we’ll start by creating a Retrofit service provider. Since all other configurations, such as dependency injection and required setup, are already present in the starter project, we only need to define an AppModule that will provide all the required services for seamless API integration.
|
1 2 3 4 5 6 7 8 9 10 11 12 13 14 15 16 17 18 19 20 21 22 23 24 25 26 27 28 29 30 31 32 33 34 35 36 37 38 |
@InstallIn(SingletonComponent::class) @Module object AppModule { @Provides fun provideRetrofitClient(): Retrofit { val loggingInterceptor = HttpLoggingInterceptor().apply { level = HttpLoggingInterceptor.Level.BODY } val okHttpClient = OkHttpClient.Builder() .addInterceptor(loggingInterceptor) .build() val contentType = "application/json".toMediaType() val json = Json { ignoreUnknownKeys = true } return Retrofit.Builder() .baseUrl("https://dummyjson.com") .client(okHttpClient) .addConverterFactory(json.asConverterFactory(contentType)) .build() } @Provides fun provideAuthApi(retrofit: Retrofit): AuthApiService { return retrofit.create(AuthApiService::class.java) } @Provides fun provideUsersApi(retrofit: Retrofit): UsersApiService { return retrofit.create(UsersApiService::class.java) } } |
This is a Hilt module that sets up dependency injection for API services. First, it builds a Retrofit client with an OkHttp logging interceptor and a JSON converter. Then, using this Retrofit instance, it provides instances of AuthApiService and UsersApiService, which were automatically generated by the Netro plugin. This setup ensures that the API services are easily accessible throughout the project.
Login Screen
Now, let’s use the generated AuthApiService in our project. If you navigate to the project structure, you’ll find AuthView.kt and AuthViewModel.kt inside the ui/auth package.
Since we’ve already set up AppModule to provide the service instances, we can simply inject AuthApiService into AuthViewModel and start using it as shown below.
|
1 2 3 4 5 6 7 8 9 10 11 12 13 14 15 16 17 18 19 20 21 22 23 24 25 26 27 28 29 30 31 32 33 34 35 36 37 38 39 40 |
@HiltViewModel class AuthViewModel @Inject constructor( private val authApiService: AuthApiService, ) : ViewModel() { private val _loginState = MutableStateFlow<LoginState>(LoginState.Idle) val loginState: StateFlow<LoginState> = _loginState.asStateFlow() private val _navigationEvent = MutableSharedFlow<String>() val navigationEvent: SharedFlow<String> = _navigationEvent.asSharedFlow() fun authenticate( username: String, password: String, ) { viewModelScope.launch { _loginState.value = LoginState.Loading try { val result = authApiService.loginUser(LoginRequest(username, password)) _loginState.value = LoginState.Success(result) _navigationEvent.emit(Screen.Users.route) } catch (e: Exception) { _loginState.value = LoginState.Error(e.message ?: "Unknown error") } } } } // Sealed class for login state sealed class LoginState { object Idle : LoginState() object Loading : LoginState() data class Success(val response: LoginResponse) : LoginState() data class Error(val message: String) : LoginState() } |
Now, let’s update AuthView.kt to integrate authentication. Since this is just a sample, we’re not saving the access token. Instead, we’re handling navigation based on the navigationEvent StateFlow. This event triggers a route change when authentication is successful, navigating the user to the appropriate screen. Simply add the following code inside your Composable to complete the integration. (If you have any confusion, feel free to check the repository for reference.)
|
1 2 3 4 5 |
LaunchedEffect(Unit) { viewModel.navigationEvent.collect { route -> onNavigate(route) } } |
Now, if you run the application and log in using the username and password below, you will be navigated to the next screen, which will be empty for now.
|
1 2 3 4 |
username: emilys password: emilyspass |
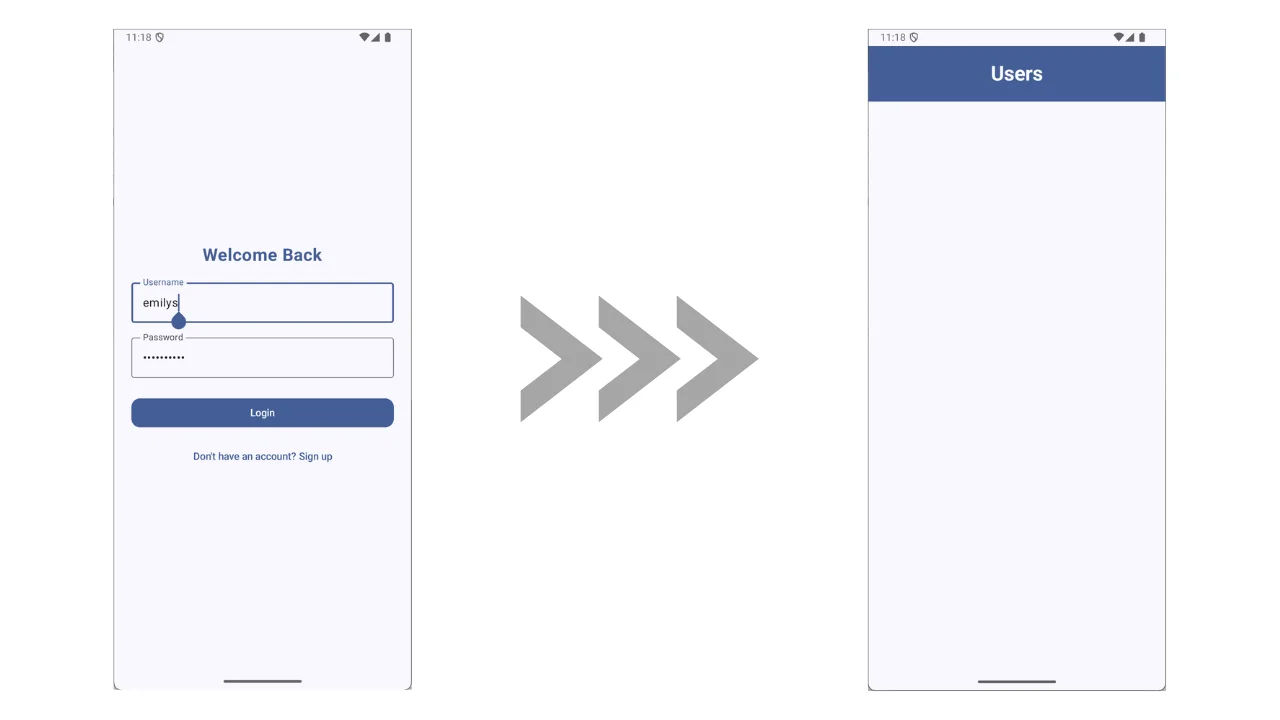
You can also check the logs to view the API request details. Congratulations! You’ve successfully consumed the first service generated with the Netro plugin. Exciting, right? Now, let’s move on to the next generated service—UsersApiService.
Users Screen
Just like before, you’ll find the ui/users package, which contains UsersView.kt and UsersViewModel.kt. Now, we’ll modify the ViewModel to consume the generated UsersApiService. Since our module is already set up, we can simply inject the service into the ViewModel. Here’s the updated UsersViewModel code.
|
1 2 3 4 5 6 7 8 9 10 11 12 13 14 15 16 17 18 19 20 21 |
@HiltViewModel class UsersViewModel @Inject constructor( private val usersApiService: UsersApiService, ) : ViewModel() { private val _users = MutableStateFlow(emptyList<User>()) val users: StateFlow<List<User>> = _users init { getUsers() } private fun getUsers() = viewModelScope.launch { val response = usersApiService.getUsers() _users.value = response.users } } |
Now, in the Composable, just collect the user data and display it using LazyColumn—quick and easy!
|
1 2 3 4 5 6 7 8 9 10 11 12 13 14 15 16 17 18 19 20 21 22 23 |
@Composable fun UsersView( modifier: Modifier = Modifier, viewModel: UsersViewModel = hiltViewModel(), onUserClick: (Int) -> Unit, ) { val users = viewModel.users.collectAsStateWithLifecycle() Column(modifier = modifier) { UsersHeader() LazyColumn { items(users.value) { user -> UserItem( user = user, onClick = { /*@Todo handle item click */ }, ) } } } } |
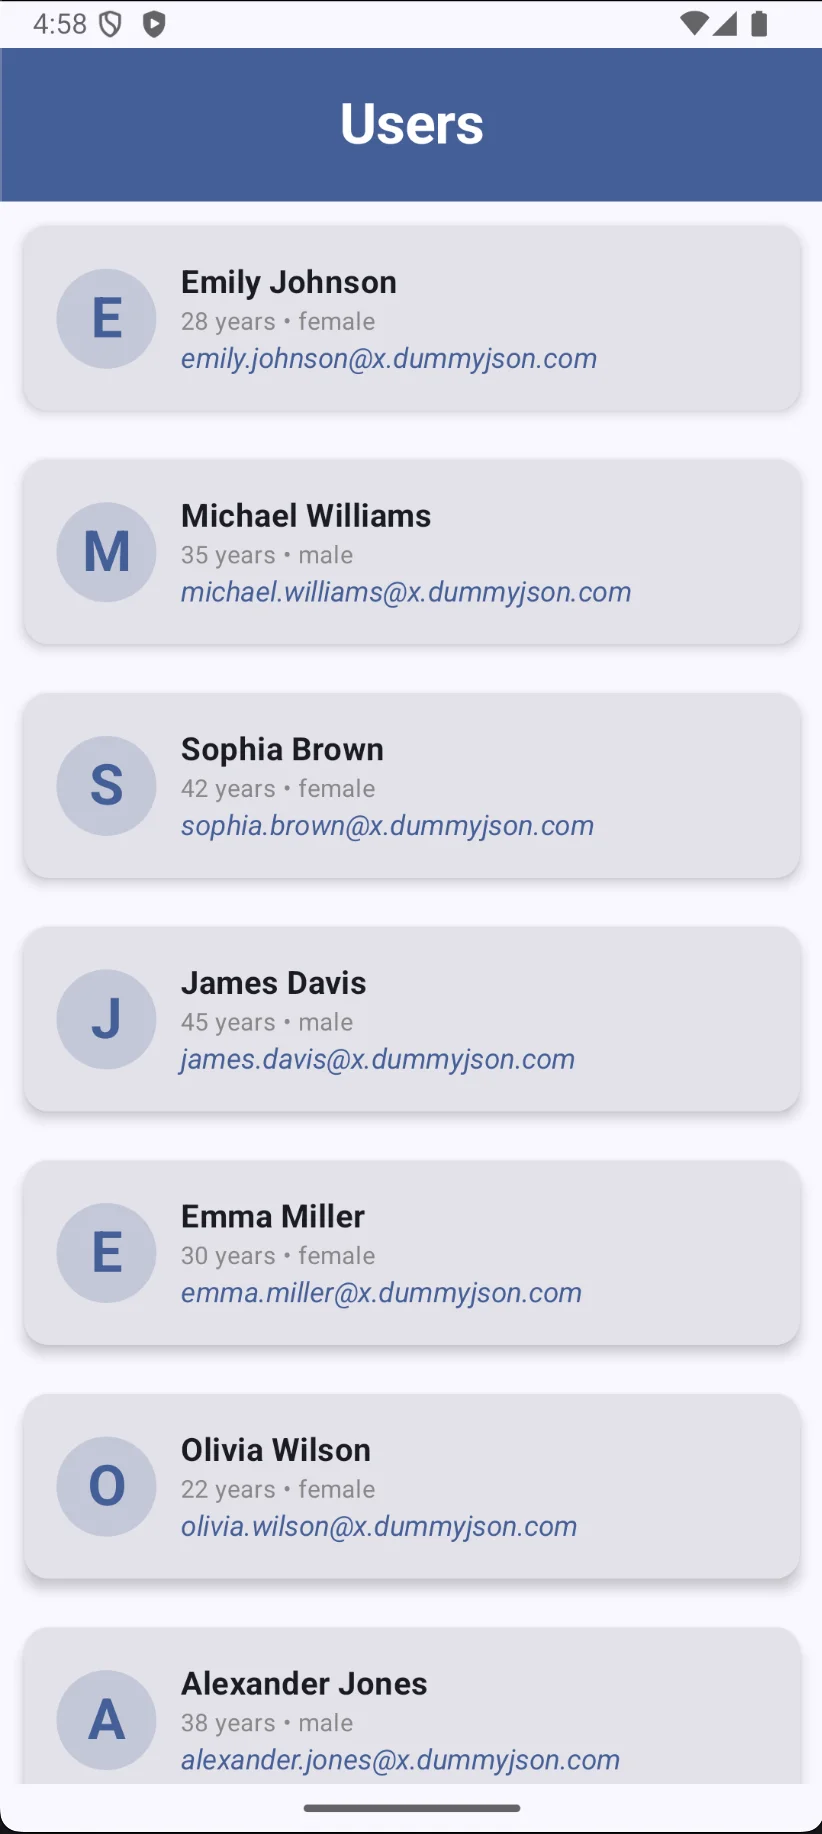
Now, just run the application, and you’ll see the list of users. No need to write any Retrofit code—everything was auto-generated! Pretty cool, right?
Final Words
That’s it for this tutorial! I hope you learned something new. If you have any questions or run into any issues, feel free to check the repository or leave a comment. If you found this post helpful, don’t forget to like and share it with others. See you in the next one! I hope this method helps you easily integrate Retrofit in Android projects.


