In this post we will learn building a complex list for our Android Application. In other words we will be building a RecyclerView with Multiple View Types. Most of the times in our android application we show a List. And sometimes it is needed that we want a list that contains different type of items in it. And this is what we will be learning in this post.
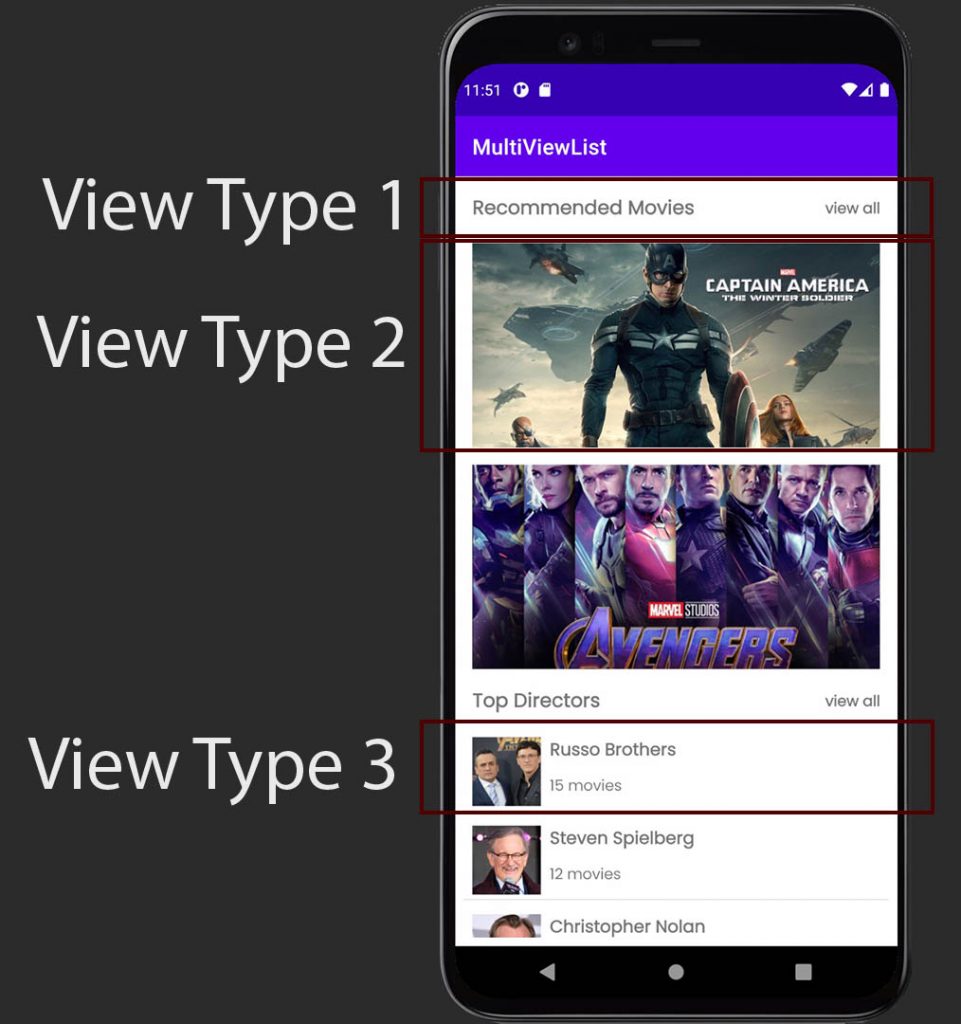
We will build the following List in this post.

As you can see here I have a complex list, that contains three different types of items in it.
- Heading Section, that explains what is below. (It contains two TextViews).
- Movies List. (It contains only a single ImageView).
- Directors List. (It contains ImageView and a couple of TextViews).
In all the previous RecyclerView Tutorials, we built a list that contains similar item in every row. But this time we are going to build a completely different kind of list that contains multiple type of items. Sounds interesting right? So let’s do it.
Table of Contents
Building a RecyclerView with Multiple View Types
If you want to learn this topic in more detailed manner, then I would advise going through this playlist, here you will learn each step that we have to make in order to build this RecyclerView.
But if you are ok with a written post then keep reading.
Pre-requisites of the project
APIs
For the list I’ve created two dummy apis using mockapi.io. The APIs are working while writing this post, but if in case the apis are not working when you are reading it, then you have to make your own dummy apis to make this project work.
The API URLs are:
|
1 2 3 4 |
https://60d194a45b017400178f3e51.mockapi.io/movies https://60d194a45b017400178f3e51.mockapi.io/directors |
Both APIs will give us a List of Movies and List of Directors. In case the APIs stopped working, I am also posting the response structure here so that you can make your own dummy apis.
List of Movies
|
1 2 3 4 5 6 7 8 9 10 11 12 13 14 15 16 |
[ { "id": "1", "title": "Captain America", "thumbnail": "https://i.ibb.co/3ffM9SK/captain-america.jpg", "release_date": "----" }, { "id": "2", "title": "Avengers Endgame", "thumbnail": "https://i.ibb.co/xCndmYK/endgame.jpg", "release_date": "----" } ] |
List of Directors
|
1 2 3 4 5 6 7 8 9 10 11 12 13 14 15 16 |
[ { "id": "1", "name": "Russo Brothers", "avatar": "https://i.ibb.co/TbR4V3b/russo.jpg", "movie_count": "15" }, { "id": "2", "name": "Steven Spielberg", "avatar": "https://i.ibb.co/y5rDhKp/steven.jpg", "movie_count": "12" } ] |
Project Architecture
I have used the following things in the project
- MVVM Architecture
- Dependency Injection using Hilt
- Retrofit for API Calls
- Fresco for loading images from URL
I will assume you know these things, and in this post my focus is just in building the RecyclerView.
Creating an Android Project
This time you should not create a new android studio project, but you should clone my source code. You will find the download link at the bottom. I have arranged the source code in different branches and you need to clone the first branch that is 1-introduction, to get the basic project that is needed for this RecyclerView with Multiple View Types Tutorial.
Assuming you’ve got the basic project, let’s move ahead.
Creating Layouts
In this project we have only a single Activity that is MainActivity.kt and inside this activity we have a RecyclerView and a ProgressBar .
|
1 2 3 4 5 6 7 8 9 10 11 12 13 14 15 16 17 18 19 20 21 22 23 24 25 26 27 28 29 30 31 32 33 34 35 |
<?xml version="1.0" encoding="utf-8"?> <androidx.constraintlayout.widget.ConstraintLayout xmlns:android="http://schemas.android.com/apk/res/android" xmlns:app="http://schemas.android.com/apk/res-auto" xmlns:tools="http://schemas.android.com/tools" android:layout_width="match_parent" android:layout_height="match_parent" tools:context=".ui.MainActivity"> <androidx.recyclerview.widget.RecyclerView android:id="@+id/recyclerView" android:layout_width="0dp" android:layout_height="0dp" android:layout_marginStart="8dp" android:layout_marginTop="8dp" android:layout_marginEnd="8dp" android:layout_marginBottom="8dp" app:layout_constraintBottom_toBottomOf="parent" app:layout_constraintEnd_toEndOf="parent" app:layout_constraintStart_toStartOf="parent" app:layout_constraintTop_toTopOf="parent" tools:listitem="@layout/item_movie" /> <ProgressBar android:visibility="gone" android:id="@+id/progress_bar" android:layout_width="wrap_content" android:layout_height="wrap_content" app:layout_constraintBottom_toBottomOf="@+id/recyclerView" app:layout_constraintEnd_toEndOf="parent" app:layout_constraintStart_toStartOf="parent" app:layout_constraintTop_toTopOf="parent" /> </androidx.constraintlayout.widget.ConstraintLayout> |
And for our List we have three individual layout files, for Title, Movie and Director in our List.
item_title.xml
|
1 2 3 4 5 6 7 8 9 10 11 12 13 14 15 16 17 18 19 20 21 22 23 24 25 26 27 28 29 30 31 32 33 34 35 36 37 38 39 40 41 |
<?xml version="1.0" encoding="utf-8"?> <androidx.constraintlayout.widget.ConstraintLayout xmlns:android="http://schemas.android.com/apk/res/android" xmlns:app="http://schemas.android.com/apk/res-auto" xmlns:tools="http://schemas.android.com/tools" android:layout_width="match_parent" android:layout_height="wrap_content"> <TextView android:id="@+id/text_view_title" android:layout_width="0dp" android:layout_height="wrap_content" android:layout_marginStart="8dp" android:layout_marginTop="8dp" android:layout_marginBottom="8dp" android:fontFamily="@font/poppins" android:textSize="18sp" android:textStyle="bold" app:layout_constraintBottom_toBottomOf="parent" app:layout_constraintEnd_toStartOf="@+id/text_view_all" app:layout_constraintHorizontal_bias="0.0" app:layout_constraintStart_toStartOf="parent" app:layout_constraintTop_toTopOf="parent" tools:text="Recommended Movies" /> <TextView android:id="@+id/text_view_all" android:layout_width="wrap_content" android:layout_height="wrap_content" android:layout_marginEnd="8dp" android:fontFamily="@font/poppins" android:text="@string/view_all" android:textSize="14sp" android:textStyle="bold" app:layout_constraintBottom_toBottomOf="@+id/text_view_title" app:layout_constraintEnd_toEndOf="parent" app:layout_constraintTop_toTopOf="@+id/text_view_title" /> </androidx.constraintlayout.widget.ConstraintLayout> |
item_movie.xml
|
1 2 3 4 5 6 7 8 9 10 11 12 13 14 15 16 17 18 19 20 21 22 23 24 25 26 |
<?xml version="1.0" encoding="utf-8"?> <androidx.constraintlayout.widget.ConstraintLayout xmlns:android="http://schemas.android.com/apk/res/android" xmlns:app="http://schemas.android.com/apk/res-auto" xmlns:tools="http://schemas.android.com/tools" android:layout_width="match_parent" android:layout_height="wrap_content"> <com.facebook.drawee.view.SimpleDraweeView android:id="@+id/image_view_movie" android:layout_width="match_parent" android:layout_height="190dp" android:layout_marginStart="8dp" android:layout_marginTop="8dp" android:layout_marginEnd="8dp" android:layout_marginBottom="8dp" app:layout_constraintBottom_toBottomOf="parent" app:layout_constraintEnd_toEndOf="parent" app:layout_constraintStart_toStartOf="parent" app:layout_constraintTop_toTopOf="parent" tools:background="@drawable/bg_toofaan" /> </androidx.constraintlayout.widget.ConstraintLayout> |
item_director.xml
|
1 2 3 4 5 6 7 8 9 10 11 12 13 14 15 16 17 18 19 20 21 22 23 24 25 26 27 28 29 30 31 32 33 34 35 36 37 38 39 40 41 42 43 44 45 46 47 48 49 50 51 52 53 54 55 56 57 58 59 |
<?xml version="1.0" encoding="utf-8"?> <androidx.constraintlayout.widget.ConstraintLayout xmlns:android="http://schemas.android.com/apk/res/android" xmlns:app="http://schemas.android.com/apk/res-auto" android:layout_width="match_parent" android:layout_height="wrap_content" xmlns:tools="http://schemas.android.com/tools"> <com.facebook.drawee.view.SimpleDraweeView android:id="@+id/image_view_director" android:layout_width="64dp" android:layout_height="64dp" android:layout_marginStart="8dp" android:layout_marginTop="8dp" android:layout_marginBottom="8dp" app:layout_constraintBottom_toBottomOf="parent" app:layout_constraintStart_toStartOf="parent" app:layout_constraintTop_toTopOf="parent" tools:background="@drawable/ic_director" /> <TextView android:id="@+id/text_view_name" android:layout_width="0dp" android:layout_height="wrap_content" android:layout_marginStart="8dp" android:layout_marginEnd="8dp" android:fontFamily="@font/poppins" android:textSize="16sp" android:textStyle="bold" app:layout_constraintEnd_toEndOf="parent" app:layout_constraintStart_toEndOf="@+id/image_view_director" app:layout_constraintTop_toTopOf="@+id/image_view_director" tools:text="Rakesh Omprakash Mehra" /> <TextView android:id="@+id/text_view_movies" android:layout_width="wrap_content" android:layout_height="wrap_content" android:layout_marginStart="8dp" android:layout_marginTop="8dp" android:fontFamily="@font/poppins" android:text="@string/total_movies" android:textSize="14sp" app:layout_constraintStart_toEndOf="@+id/image_view_director" app:layout_constraintTop_toBottomOf="@+id/text_view_name" /> <View android:layout_width="0dp" android:layout_height="1dp" android:layout_marginTop="4dp" android:layout_marginBottom="4dp" android:background="#E3E3E3" app:layout_constraintBottom_toBottomOf="parent" app:layout_constraintEnd_toEndOf="parent" app:layout_constraintStart_toStartOf="parent" app:layout_constraintTop_toBottomOf="@+id/image_view_director" /> </androidx.constraintlayout.widget.ConstraintLayout> |
Keep in mind that we have ViewBinding enabled for this project, and it will generate classes for all your layout files and in the coding section we will be using these binding classes generated by ViewBinding.
Creating RecyclerView Item Data Class
To hold RecyclerView data we will create a sealed class.
|
1 2 3 4 5 6 7 8 9 10 11 12 13 14 15 16 17 18 19 20 21 22 23 24 |
sealed class HomeRecyclerViewItem { class Title( val id: Int, val title: String ) : HomeRecyclerViewItem() class Movie( val id: Int, val title: String, val thumbnail: String, val release_date: String ) : HomeRecyclerViewItem() class Director( val id: Int, val name: String, val avatar: String, val movie_count: Int ) : HomeRecyclerViewItem() } |
Creating RecyclerView ViewHolders
I hope you know that, we make ViewHolders for our ListItems when we use RecyclerView as it enforces us to use the ViewHolder pattern. And to make a ViewHolder, we can write our own implementation of RecyclerView.ViewHolder class. Each ViewHolder will hold a specific view of our list. In most cases we make only a single ViewHolder, but this time we are building a complex list and hence we will make multiple ViewHolders. Each ViewHolder will hold a specific View that is needed for our list.
|
1 2 3 4 5 6 7 8 9 10 11 12 13 14 15 16 17 18 19 20 21 22 23 24 |
sealed class HomeRecyclerViewHolder(binding: ViewBinding) : RecyclerView.ViewHolder(binding.root) { class TitleViewHolder(private val binding: ItemTitleBinding) : HomeRecyclerViewHolder(binding){ fun bind(title: HomeRecyclerViewItem.Title){ binding.textViewTitle.text = title.title } } class MovieViewHolder(private val binding: ItemMovieBinding) : HomeRecyclerViewHolder(binding){ fun bind(movie: HomeRecyclerViewItem.Movie){ binding.imageViewMovie.loadImage(movie.thumbnail) } } class DirectorViewHolder(private val binding: ItemDirectorBinding) : HomeRecyclerViewHolder(binding){ fun bind(director: HomeRecyclerViewItem.Director){ binding.imageViewDirector.loadImage(director.avatar) binding.textViewName.text = director.name binding.textViewMovies.text = binding.textViewMovies.context.getString(R.string.total_movies, director.movie_count) } } } |
As you can see first I have created a sealed ViewHolder class and then all three of my ViewHolder classes are defined using the same sealed ViewHolder class. Using sealed class will help us to make sure that these are only the options available for the ViewHolder. And if you need more types of Views then you can add more ViewHolder implementations inside this sealed class.
We also have a bind function inside each ViewHolder implementation, that will bind the given item with the View.
Creating RecyclerViewAdapter
We can create the ReclerViewAdapter like this.
|
1 2 3 4 5 6 7 8 9 10 11 12 13 14 15 16 17 18 19 20 21 22 23 24 25 26 27 28 29 30 31 32 33 34 35 36 37 38 39 40 41 42 43 44 45 46 47 48 49 50 51 52 53 54 55 |
class HomeRecyclerViewAdapter : RecyclerView.Adapter<HomeRecyclerViewHolder>() { var items = listOf<HomeRecyclerViewItem>() set(value) { field = value notifyDataSetChanged() } override fun onCreateViewHolder(parent: ViewGroup, viewType: Int): HomeRecyclerViewHolder { return when(viewType){ R.layout.item_title -> HomeRecyclerViewHolder.TitleViewHolder( ItemTitleBinding.inflate( LayoutInflater.from(parent.context), parent, false ) ) R.layout.item_movie -> HomeRecyclerViewHolder.MovieViewHolder( ItemMovieBinding.inflate( LayoutInflater.from(parent.context), parent, false ) ) R.layout.item_director -> HomeRecyclerViewHolder.DirectorViewHolder( ItemDirectorBinding.inflate( LayoutInflater.from(parent.context), parent, false ) ) else -> throw IllegalArgumentException("Invalid ViewType Provided") } } override fun onBindViewHolder(holder: HomeRecyclerViewHolder, position: Int) { when(holder){ is HomeRecyclerViewHolder.DirectorViewHolder -> holder.bind(items[position] as HomeRecyclerViewItem.Director) is HomeRecyclerViewHolder.MovieViewHolder -> holder.bind(items[position] as HomeRecyclerViewItem.Movie) is HomeRecyclerViewHolder.TitleViewHolder -> holder.bind(items[position] as HomeRecyclerViewItem.Title) } } override fun getItemCount() = items.size override fun getItemViewType(position: Int): Int { return when(items[position]){ is HomeRecyclerViewItem.Director -> R.layout.item_director is HomeRecyclerViewItem.Movie -> R.layout.item_movie is HomeRecyclerViewItem.Title -> R.layout.item_title } } } |
The code is similar to a normal RecyclerViewAdapter, the only difference is this time we have one more function getItemViewType() . Inside this function we are checking what is the type of current item based on that we are returning the layout id.
And with the help of this layout id returned, inside onCreateViewHolder() we are checking the current ViewType, and generating the ViewHolder instance accordingly.
And finally inside onBindViewHolder() we are checking the type of the holder and accordingly we are binding the data with the ViewHolder .
Now we can use this adapter to create our RecyclerView with Multiple View Types.
Getting Movies and Directors and Merging into a Single List
Now we we need to get the data from API, then we will merge individual lists (Movies and Directors) to a single List (HomeRecyclerViewItem).
|
1 2 3 4 5 6 7 8 9 10 11 12 13 14 15 16 17 18 19 20 21 22 23 24 25 26 27 28 29 30 31 32 33 34 35 |
@HiltViewModel class HomeViewModel @Inject constructor( private val repository: Repository ) : ViewModel() { private val _homeListItemsLiveData = MutableLiveData<Resource<List<HomeRecyclerViewItem>>>() val homeListItemsLiveData: LiveData<Resource<List<HomeRecyclerViewItem>>> get() = _homeListItemsLiveData init { getHomeListItems() } private fun getHomeListItems() = viewModelScope.launch { _homeListItemsLiveData.postValue(Resource.Loading) val moviesDeferred = async { repository.getMovies() } val directorsDeferred = async { repository.getDirectors() } val movies = moviesDeferred.await() val directors = directorsDeferred.await() val homeItemsList = mutableListOf<HomeRecyclerViewItem>() if(movies is Resource.Success && directors is Resource.Success){ homeItemsList.add(HomeRecyclerViewItem.Title(1, "Recommended Movies")) homeItemsList.addAll(movies.value) homeItemsList.add(HomeRecyclerViewItem.Title(2, "Top Directors")) homeItemsList.addAll(directors.value) _homeListItemsLiveData.postValue(Resource.Success(homeItemsList)) }else{ Resource.Failure(false, null, null) } } } |
Creating the RecyclerView
Now, let’s come to MainActivity.kt and write the following code.
|
1 2 3 4 5 6 7 8 9 10 11 12 13 14 15 16 17 18 19 20 21 22 23 24 25 26 27 28 29 30 31 32 33 34 35 |
@AndroidEntryPoint class MainActivity : AppCompatActivity() { private lateinit var binding: ActivityMainBinding private val viewModel by viewModels<HomeViewModel>() private val homeRecyclerViewAdapter = HomeRecyclerViewAdapter() override fun onCreate(savedInstanceState: Bundle?) { super.onCreate(savedInstanceState) binding = ActivityMainBinding.inflate(layoutInflater) setContentView(binding.root) binding.recyclerView.apply { setHasFixedSize(true) layoutManager = LinearLayoutManager(this@MainActivity) adapter = homeRecyclerViewAdapter } viewModel.homeListItemsLiveData.observe(this){ result -> when(result){ is Resource.Failure -> { binding.progressBar.hide() //handle failure case here } Resource.Loading -> binding.progressBar.show() is Resource.Success -> { binding.progressBar.hide() homeRecyclerViewAdapter.items = result.value } } } } } |
You can also use Hilt to inject adapter in your Activity class, but that’s I leave onto you. So basically here I am getting the List from the ViewModel and adding the items to the adapter. And that’s it.
You can run the project now to see if it is working or not.

RecyclerView with Multiple View Types Source Code
And if you are in hurry you can simply get my source code from this link. But make sure you SHARE this post with your friends, only when if you think I’ve earned it.


