In the last post we uploaded our image from gallery to our MySQL Database. In this post we will see how we can fetch those uploaded images. If you have not read the last tutorial, then before going through this Android Download Image from Server tutorial you should first check the last tutorial.
Android Upload Image to Server Using PHP MySQL
Android Download Image from MySQL Database
- First go to your hosting account. For this tutorial I am using free hosting account by hostinger.
- In last tutorial we created two scripts. One for database connection and other one for storing image to database. Now we need to create one more php script that will fetch the uploaded image.
- Create a new PHP file. I am creating getImage.php
- Copy the following code
|
1 2 3 4 5 6 7 8 9 10 11 12 13 14 15 16 17 18 19 20 21 22 |
<?php if($_SERVER['REQUEST_METHOD']=='GET'){ $id = $_GET['id']; $sql = "select * from images where id = '$id'"; require_once('dbConnect.php'); $r = mysqli_query($con,$sql); $result = mysqli_fetch_array($r); header('content-type: image/jpeg'); echo base64_decode($result['image']); mysqli_close($con); }else{ echo "Error"; } |
Explanation of Code:
- As you can see we are receiving the id with Http Get Request. Then we are fetching the particular image string using sql query. Now set content-type as image or jpeg using header function. And finally we just written an echo statement with base64_decode function. This will echo the image string in image format.
Now go ahead:
- Upload this file to your hosting account.
- Note down the URL for this php script. In my case the URL is – http://simplifiedcoding.16mb.com/ImageUpload/getImage.php
Creating Android Download Image Activity
- Now we will create a new Activity. In this activity user will give the image id and we will fetch the image by id.
- Right click on layout-> New -> Activity -> Blank Activity (I created ViewImage)
- Now a layout xml file and a java file is created (ViewImage.java and activity_view_image.xml)
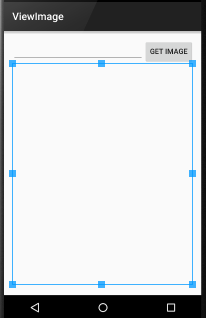
- Come to the layout file. We need to create the following layout.

- Use the following code for creating the above layout
|
1 2 3 4 5 6 7 8 9 10 11 12 13 14 15 16 17 18 19 20 21 22 23 24 25 26 27 28 29 30 31 32 33 34 35 36 37 |
<LinearLayout xmlns:android="http://schemas.android.com/apk/res/android" xmlns:tools="http://schemas.android.com/tools" android:layout_width="match_parent" android:orientation="vertical" android:layout_height="match_parent" android:paddingLeft="@dimen/activity_horizontal_margin" android:paddingRight="@dimen/activity_horizontal_margin" android:paddingTop="@dimen/activity_vertical_margin" android:paddingBottom="@dimen/activity_vertical_margin" tools:context="net.simplifiedcoding.imageuploadsample.ViewImage"> <LinearLayout android:orientation="horizontal" android:layout_width="match_parent" android:layout_height="wrap_content"> <EditText android:layout_width="match_parent" android:layout_height="wrap_content" android:layout_weight="1" android:id="@+id/editTextId" /> <Button android:layout_width="wrap_content" android:layout_height="wrap_content" android:text="Get Image" android:id="@+id/buttonGetImage" /> </LinearLayout> <ImageView android:layout_width="match_parent" android:layout_height="match_parent" android:id="@+id/imageViewShow" /> </LinearLayout> |
Explanation:
- We have created a horizontal linear layout inside a vertical linear layout. In horizontal part we have an EditText and a Button. In EditText user is supposed to enter the image id. After entering image id user will press the button and then we will show the fetched image in the ImageView we created.
Go Ahead:
- At last tutorial in our main layout we created a View Image button. Now we will add functionality to this button.
- So come to your MainActivity.java class
- See this code this is the updated code. You need to update your code as shown here.
|
1 2 3 4 5 6 7 8 9 10 11 12 13 14 15 16 17 18 19 20 21 22 23 24 25 26 27 28 29 30 31 32 33 34 35 36 37 38 39 40 41 42 43 44 45 46 47 48 49 50 51 52 53 54 55 56 57 58 59 60 61 62 63 64 65 66 67 68 69 70 71 72 73 74 75 76 77 78 79 80 81 82 83 84 85 86 87 88 89 90 91 92 93 94 95 96 97 98 99 100 101 102 103 104 105 106 107 108 109 110 111 112 113 114 115 116 117 118 119 120 121 122 123 124 125 126 127 128 129 130 131 132 133 134 135 136 137 138 139 140 141 142 143 144 145 146 |
package net.simplifiedcoding.imageuploadsample; import android.app.ProgressDialog; import android.content.Context; import android.content.Intent; import android.database.Cursor; import android.graphics.Bitmap; import android.net.Uri; import android.os.AsyncTask; import android.provider.MediaStore; import android.support.v7.app.AppCompatActivity; import android.os.Bundle; import android.util.Base64; import android.util.Log; import android.view.Menu; import android.view.MenuItem; import android.view.View; import android.widget.Button; import android.widget.ImageView; import android.widget.Toast; import java.io.ByteArrayOutputStream; import java.io.IOException; import java.util.HashMap; public class MainActivity extends AppCompatActivity implements View.OnClickListener { public static final String UPLOAD_URL = "http://simplifiedcoding.16mb.com/ImageUpload/upload.php"; public static final String UPLOAD_KEY = "image"; public static final String TAG = "MY MESSAGE"; private int PICK_IMAGE_REQUEST = 1; private Button buttonChoose; private Button buttonUpload; private Button buttonView; private ImageView imageView; private Bitmap bitmap; private Uri filePath; @Override protected void onCreate(Bundle savedInstanceState) { super.onCreate(savedInstanceState); setContentView(R.layout.activity_main); buttonChoose = (Button) findViewById(R.id.buttonChoose); buttonUpload = (Button) findViewById(R.id.buttonUpload); buttonView = (Button) findViewById(R.id.buttonViewImage); imageView = (ImageView) findViewById(R.id.imageView); buttonChoose.setOnClickListener(this); buttonUpload.setOnClickListener(this); buttonView.setOnClickListener(this); } private void showFileChooser() { Intent intent = new Intent(); intent.setType("image/*"); intent.setAction(Intent.ACTION_GET_CONTENT); startActivityForResult(Intent.createChooser(intent, "Select Picture"), PICK_IMAGE_REQUEST); } @Override protected void onActivityResult(int requestCode, int resultCode, Intent data) { super.onActivityResult(requestCode, resultCode, data); if (requestCode == PICK_IMAGE_REQUEST && resultCode == RESULT_OK && data != null && data.getData() != null) { filePath = data.getData(); try { bitmap = MediaStore.Images.Media.getBitmap(getContentResolver(), filePath); imageView.setImageBitmap(bitmap); } catch (IOException e) { e.printStackTrace(); } } } public String getStringImage(Bitmap bmp){ ByteArrayOutputStream baos = new ByteArrayOutputStream(); bmp.compress(Bitmap.CompressFormat.JPEG, 100, baos); byte[] imageBytes = baos.toByteArray(); String encodedImage = Base64.encodeToString(imageBytes, Base64.DEFAULT); return encodedImage; } private void uploadImage(){ class UploadImage extends AsyncTask<Bitmap,Void,String>{ ProgressDialog loading; RequestHandler rh = new RequestHandler(); @Override protected void onPreExecute() { super.onPreExecute(); loading = ProgressDialog.show(MainActivity.this, "Uploading...", null,true,true); } @Override protected void onPostExecute(String s) { super.onPostExecute(s); loading.dismiss(); Toast.makeText(getApplicationContext(),s,Toast.LENGTH_LONG).show(); } @Override protected String doInBackground(Bitmap... params) { Bitmap bitmap = params[0]; String uploadImage = getStringImage(bitmap); HashMap<String,String> data = new HashMap<>(); data.put(UPLOAD_KEY, uploadImage); String result = rh.sendPostRequest(UPLOAD_URL,data); return result; } } UploadImage ui = new UploadImage(); ui.execute(bitmap); } @Override public void onClick(View v) { if (v == buttonChoose) { showFileChooser(); } if(v == buttonUpload){ uploadImage(); } if(v == buttonView){ viewImage(); } } private void viewImage() { startActivity(new Intent(this, ViewImage.class)); } } |
Explanation:
- This part is same as the last part. We just created a new button to open ImageView activity. We are opening the ImageView activity by using Intent.
Go Ahead:
- After updating your MainActivity.java file, when we will tap the view image button, our ViewImage activity will open.
- Now finally come to your ViewImage.java file and write the following code
|
1 2 3 4 5 6 7 8 9 10 11 12 13 14 15 16 17 18 19 20 21 22 23 24 25 26 27 28 29 30 31 32 33 34 35 36 37 38 39 40 41 42 43 44 45 46 |
package net.simplifiedcoding.imageuploadsample; import android.app.ProgressDialog; import android.graphics.Bitmap; import android.graphics.BitmapFactory; import android.os.AsyncTask; import android.support.v7.app.AppCompatActivity; import android.os.Bundle; import android.util.Base64; import android.view.Menu; import android.view.MenuItem; import android.view.View; import android.widget.Button; import android.widget.EditText; import android.widget.ImageView; public class ViewImage extends AppCompatActivity implements View.OnClickListener{ private EditText editTextId; private Button buttonGetImage; private ImageView imageView; private RequestHandler requestHandler; @Override protected void onCreate(Bundle savedInstanceState) { super.onCreate(savedInstanceState); setContentView(R.layout.activity_view_image); editTextId = (EditText) findViewById(R.id.editTextId); buttonGetImage = (Button) findViewById(R.id.buttonGetImage); imageView = (ImageView) findViewById(R.id.imageViewShow); requestHandler = new RequestHandler(); buttonGetImage.setOnClickListener(this); } @Override public void onClick(View v) { getImage(); } } |
Explanation:
- We declared the instances of our EditText, ImageView, Button and RequestHandler. In onCreate method we initialized our instances and for button we set the onClickListener which is the current class itself.
- In onClick method we wrote a method getImage(). This method will fetch the respective image according to the id given.
- Now we need to create the getImage method. See the following code.
getImage()
|
1 2 3 4 5 6 7 8 9 10 11 12 13 14 15 16 17 18 19 20 21 22 23 24 25 26 27 28 29 30 31 32 33 34 35 36 37 38 39 40 41 |
private void getImage() { String id = editTextId.getText().toString().trim(); class GetImage extends AsyncTask<String,Void,Bitmap>{ ProgressDialog loading; @Override protected void onPreExecute() { super.onPreExecute(); loading = ProgressDialog.show(ViewImage.this, "Uploading...", null,true,true); } @Override protected void onPostExecute(Bitmap b) { super.onPostExecute(b); loading.dismiss(); imageView.setImageBitmap(b); } @Override protected Bitmap doInBackground(String... params) { String id = params[0]; String add = "http://simplifiedcoding.16mb.com/ImageUpload/getImage.php?id="+id; URL url = null; Bitmap image = null; try { url = new URL(add); image = BitmapFactory.decodeStream(url.openConnection().getInputStream()); } catch (MalformedURLException e) { e.printStackTrace(); } catch (IOException e) { e.printStackTrace(); } return image; } } GetImage gi = new GetImage(); gi.execute(id); } |
Final Code for ViewImage.java
|
1 2 3 4 5 6 7 8 9 10 11 12 13 14 15 16 17 18 19 20 21 22 23 24 25 26 27 28 29 30 31 32 33 34 35 36 37 38 39 40 41 42 43 44 45 46 47 48 49 50 51 52 53 54 55 56 57 58 59 60 61 62 63 64 65 66 67 68 69 70 71 72 73 74 75 76 77 78 79 80 81 82 83 84 85 86 87 88 89 90 91 |
package net.simplifiedcoding.imageuploadsample; import android.app.ProgressDialog; import android.graphics.Bitmap; import android.graphics.BitmapFactory; import android.os.AsyncTask; import android.support.v7.app.AppCompatActivity; import android.os.Bundle; import android.util.Base64; import android.view.Menu; import android.view.MenuItem; import android.view.View; import android.widget.Button; import android.widget.EditText; import android.widget.ImageView; import java.io.IOException; import java.net.MalformedURLException; import java.net.URL; public class ViewImage extends AppCompatActivity implements View.OnClickListener{ private EditText editTextId; private Button buttonGetImage; private ImageView imageView; private RequestHandler requestHandler; @Override protected void onCreate(Bundle savedInstanceState) { super.onCreate(savedInstanceState); setContentView(R.layout.activity_view_image); editTextId = (EditText) findViewById(R.id.editTextId); buttonGetImage = (Button) findViewById(R.id.buttonGetImage); imageView = (ImageView) findViewById(R.id.imageViewShow); requestHandler = new RequestHandler(); buttonGetImage.setOnClickListener(this); } private void getImage() { String id = editTextId.getText().toString().trim(); class GetImage extends AsyncTask<String,Void,Bitmap>{ ProgressDialog loading; @Override protected void onPreExecute() { super.onPreExecute(); loading = ProgressDialog.show(ViewImage.this, "Uploading...", null,true,true); } @Override protected void onPostExecute(Bitmap b) { super.onPostExecute(b); loading.dismiss(); imageView.setImageBitmap(b); } @Override protected Bitmap doInBackground(String... params) { String id = params[0]; String add = "http://simplifiedcoding.16mb.com/ImageUpload/getImage.php?id="+id; URL url = null; Bitmap image = null; try { url = new URL(add); image = BitmapFactory.decodeStream(url.openConnection().getInputStream()); } catch (MalformedURLException e) { e.printStackTrace(); } catch (IOException e) { e.printStackTrace(); } return image; } } GetImage gi = new GetImage(); gi.execute(id); } @Override public void onClick(View v) { getImage(); } } |
- Now thats it for Android Download Image tutorial.
- You can also download the source code of Android Download Image App from the link given below.
[easy_media_download url=”https://dl.dropboxusercontent.com/s/7eg2d1zq5brev1y/android-upload-image-to-server.zip?dl=0″ text=”Download Source”]
Video Demo of Android Download Image from MySQL Database
So thats it for this tutorial friends. If you are having any confusion for this Android Download Image Tutorial feel free to leave your comments. Thank You 🙂


