Hello friends, welcome to our new tutorial. In this tutorial we will create a login with facebook android app using android studio and facebook sdk 4.0. So lets begin.
Creating Android Project
- Open Android Studio and Click on File-> New ->New Project
- Give your application a name (in my case it is AndroidLogin) and a package (mine is net.simplifiedcoding)
- Select Phone or Tablet
- Select Blank Activity with Fragment.
- Leave the rest things as it is and finish.
- Now once our project is ready we need to configure a lot of things so lets begin.
Prerequisites for creating Login with Facebook Android App
- Facebook app configured and linked to our android app
- Facebook SDK
- Facebook App ID
- Android Key Hash
- Facebook Activity
Lets start with creating Facebook App
Configuring Facebook SDK to Android Studio
- Go to your gradle scripts -> build.gradle(Module:app)
- Add the following code
|
1 2 3 4 5 |
repositories { mavenCentral() } |
- Now add a new dependency for Facebook SDK
- Inside dependencies add this line
|
1 2 3 |
compile 'com.facebook.android:facebook-android-sdk:4.0.0' |
- It will download facebook sdk and will take some time. It can take long time if you have a slow internet connection. So mean while lets create our facebook app.
Creating Facebook App
- Go to https://developers.facebook.com/. If you have not registered yourself as a developer yet then facebook will ask you to register as a developer. Simply register as a developer. (Congrats you are now a developer :P)
- From the top navigation menu hover over my apps.
- Then click add a new app.
- You will asked to select a platform, click on android.
- On the new page you can select quick start or you can select skip and create app id from the upper right corner.
- Click on skip and create app id.
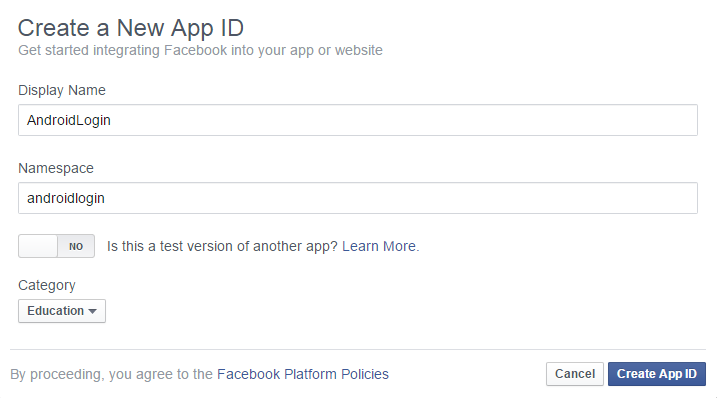
- Give a display name and a namespace for your app as shown in the image below.

- Click create app id.
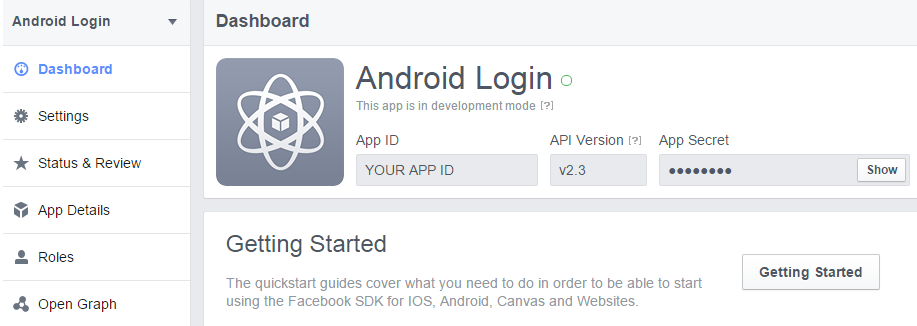
- You will be redirected to your apps dashboard.

- Here you can get your app id. Copy the app id it will be used further. (I have made my app id hidden because i cant let you see it for security reasons)
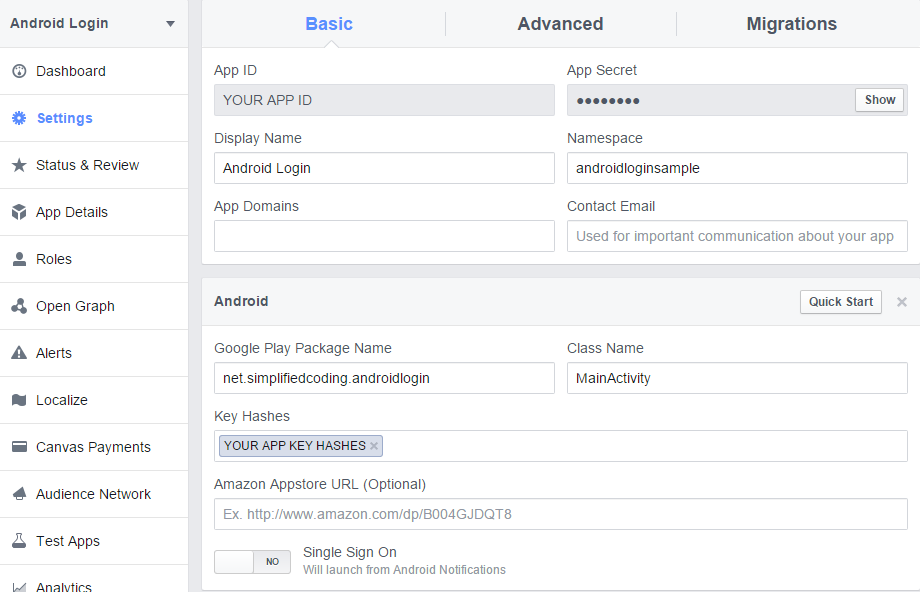
- Now from the left click on settings.
- Click on add a platform and select android.
- Enter your package name and class name of your main activity and click on save changes
- The last thing you need is your App Key Hashes.

Generating Key Hashes for your Login With Facebook Android App
- Go to android studio.
- On your project open your strings.xml file (res->values->strings.xml)
- Add the below code
|
1 2 3 |
<string name="app_id">YOUR APP ID</string> |
- Replace your actual app id with your app id.
- Now go to your AndroidManifest.xml
- First add internet permission using the following code
|
1 2 3 |
<uses-permission android:name="android.permission.INTERNET"/> |
- Add a this meta-data code inside your application
|
1 2 3 |
<meta-data android:name="com.facebook.sdk.ApplicationId" android:value="@string/app_id"/> |
- This is containing our app id which we defined inside strings.xml.
- Now create a new class in your package and name it MyApplication (name doesn’t matter you can name it anything)
- Copy the following code
|
1 2 3 4 5 6 7 8 9 10 11 12 13 14 15 16 17 18 19 20 21 22 23 24 25 26 27 28 29 30 31 32 33 34 35 36 37 38 39 40 41 42 |
package net.simplifiedcoding.androidlogin; import android.app.Application; import android.content.pm.PackageInfo; import android.content.pm.PackageManager; import android.content.pm.Signature; import android.util.Base64; import android.util.Log; import java.security.MessageDigest; import java.security.NoSuchAlgorithmException; /** * Created by Belal on 5/3/2015. */ public class MyApplication extends Application { @Override public void onCreate() { super.onCreate(); printHashKey(); } public void printHashKey(){ // Add code to print out the key hash try { PackageInfo info = getPackageManager().getPackageInfo( "net.simplifiedcoding.androidlogin", PackageManager.GET_SIGNATURES); for (Signature signature : info.signatures) { MessageDigest md = MessageDigest.getInstance("SHA"); md.update(signature.toByteArray()); Log.d("KeyHash:", Base64.encodeToString(md.digest(), Base64.DEFAULT)); } } catch (PackageManager.NameNotFoundException e) { } catch (NoSuchAlgorithmException e) { } } } |
- Make sure in the above code your provide your application’s package name.
- The above class will print the KeyHash in the logcat. But we still need to define this class inside your AndroidManifest.
- Go to AndroidManifest.xml again and Inside application opening tag define your class as shown below
|
1 2 3 4 5 6 7 8 9 10 11 12 13 |
<application android:name=".MyApplication" android:allowBackup="true" android:icon="@mipmap/ic_launcher" android:label="@string/app_name" android:theme="@style/AppTheme" > <meta-data android:name="com.facebook.sdk.ApplicationId" android:value="@string/app_id"/> . . . </application> |
- Now execute your app and you will get your keyhash in your logcat.
- Copy the keyhash and enter that to your app settings in facebook and click save.
Creating your Login With Facebook Android App
- For facebook login Facebook SDK provides an activity that will open while login. You only need to add that activity to your manifest file.
- Add the facebook activity using the following code.
|
1 2 3 4 5 6 7 |
<activity android:name="com.facebook.FacebookActivity" android:configChanges= "keyboard|keyboardHidden|screenLayout|screenSize|orientation" android:theme="@android:style/Theme.Translucent.NoTitleBar" android:label="@string/app_name" /> |
- So your final AndroidManifest.xml would be like
|
1 2 3 4 5 6 7 8 9 10 11 12 13 14 15 16 17 18 19 20 21 22 23 24 25 26 27 28 29 30 31 32 |
<?xml version="1.0" encoding="utf-8"?> <manifest xmlns:android="http://schemas.android.com/apk/res/android" package="net.simplifiedcoding.androidlogin" > <uses-permission android:name="android.permission.INTERNET"/> <application android:name=".MyApplication" android:allowBackup="true" android:icon="@mipmap/ic_launcher" android:label="@string/app_name" android:theme="@style/AppTheme" > <meta-data android:name="com.facebook.sdk.ApplicationId" android:value="@string/app_id"/> <activity android:name=".MainActivity" android:label="@string/app_name" > <intent-filter> <action android:name="android.intent.action.MAIN" /> <category android:name="android.intent.category.LAUNCHER" /> </intent-filter> </activity> <activity android:name="com.facebook.FacebookActivity" android:configChanges= "keyboard|keyboardHidden|screenLayout|screenSize|orientation" android:theme="@android:style/Theme.Translucent.NoTitleBar" android:label="@string/app_name" /> </application> </manifest> |
- Now come to your fragment layout and create a TextView and a Facebook Login Button. The button is provided by facebook sdk. You can use the below code.
|
1 2 3 4 5 6 7 8 9 10 11 12 13 14 15 16 17 18 19 20 21 22 23 |
<LinearLayout xmlns:android="http://schemas.android.com/apk/res/android" xmlns:tools="http://schemas.android.com/tools" android:layout_width="match_parent" android:layout_height="match_parent" android:paddingLeft="@dimen/activity_horizontal_margin" android:paddingRight="@dimen/activity_horizontal_margin" android:orientation="vertical" android:paddingTop="@dimen/activity_vertical_margin" android:paddingBottom="@dimen/activity_vertical_margin" tools:context=".MainActivityFragment"> <TextView android:layout_width="fill_parent" android:layout_height="wrap_content" android:text="New Text" android:id="@+id/textView" android:layout_centerHorizontal="true"/> <com.facebook.login.widget.LoginButton android:id="@+id/login_button" android:layout_width="fill_parent" android:layout_height="wrap_content" /> </LinearLayout> |
- We will show the user name in the textview after successful login.
- Go to your MainFragment.java and copy the following code.
|
1 2 3 4 5 6 7 8 9 10 11 12 13 14 15 16 17 18 19 20 21 22 23 24 25 26 27 28 29 30 31 32 33 34 35 36 37 38 39 40 41 42 43 44 45 46 47 48 49 50 51 52 53 54 55 56 57 58 59 60 61 62 63 64 65 66 67 68 69 70 71 72 73 74 75 76 77 78 79 80 81 82 83 84 85 86 87 88 89 90 91 92 93 94 95 96 97 98 99 100 101 102 103 104 105 106 107 108 109 110 111 112 113 114 115 116 117 118 119 120 121 122 123 124 125 126 127 128 129 |
package net.simplifiedcoding.androidlogin; import android.content.Intent; import android.support.v4.app.Fragment; import android.os.Bundle; import android.view.LayoutInflater; import android.view.View; import android.view.ViewGroup; import android.widget.TextView; import com.facebook.AccessToken; import com.facebook.AccessTokenTracker; import com.facebook.CallbackManager; import com.facebook.FacebookCallback; import com.facebook.FacebookException; import com.facebook.FacebookSdk; import com.facebook.Profile; import com.facebook.ProfileTracker; import com.facebook.login.LoginResult; import com.facebook.login.widget.LoginButton; /** * A placeholder fragment containing a simple view. */ public class MainFragment extends Fragment { private CallbackManager callbackManager; private TextView textView; private AccessTokenTracker accessTokenTracker; private ProfileTracker profileTracker; private FacebookCallback<LoginResult> callback = new FacebookCallback<LoginResult>() { @Override public void onSuccess(LoginResult loginResult) { AccessToken accessToken = loginResult.getAccessToken(); Profile profile = Profile.getCurrentProfile(); displayMessage(profile); } @Override public void onCancel() { } @Override public void onError(FacebookException e) { } }; public MainFragment() { } @Override public void onCreate(Bundle savedInstanceState){ super.onCreate(savedInstanceState); FacebookSdk.sdkInitialize(getActivity().getApplicationContext()); callbackManager = CallbackManager.Factory.create(); accessTokenTracker= new AccessTokenTracker() { @Override protected void onCurrentAccessTokenChanged(AccessToken oldToken, AccessToken newToken) { } }; profileTracker = new ProfileTracker() { @Override protected void onCurrentProfileChanged(Profile oldProfile, Profile newProfile) { displayMessage(newProfile); } }; accessTokenTracker.startTracking(); profileTracker.startTracking(); } @Override public View onCreateView(LayoutInflater inflater, ViewGroup container, Bundle savedInstanceState) { return inflater.inflate(R.layout.fragment_main, container, false); } @Override public void onViewCreated(View view, Bundle savedInstanceState) { super.onViewCreated(view, savedInstanceState); LoginButton loginButton = (LoginButton) view.findViewById(R.id.login_button); textView = (TextView) view.findViewById(R.id.textView); loginButton.setReadPermissions("user_friends"); loginButton.setFragment(this); loginButton.registerCallback(callbackManager, callback); } @Override public void onActivityResult(int requestCode, int resultCode, Intent data) { super.onActivityResult(requestCode, resultCode, data); callbackManager.onActivityResult(requestCode, resultCode, data); } private void displayMessage(Profile profile){ if(profile != null){ textView.setText(profile.getName()); } } @Override public void onStop() { super.onStop(); accessTokenTracker.stopTracking(); profileTracker.stopTracking(); } @Override public void onResume() { super.onResume(); Profile profile = Profile.getCurrentProfile(); displayMessage(profile); } } |
- Run your app now and Bravo it works 😉
- If you are having troubles then you can download the source code of this project from here
[sociallocker id=1372] [download id=”1392″] [/sociallocker]
Some more android tutorials you should check
So thats all for this login with facebook android app tutorial friends. Feel free to ask if you have any queries or troubles following the steps. Thank you 🙂


